Roles Management
Comprehensive roles management in BigPanda allows you to easily dictate access to resources. Permissions are separated by functional area and resource type, with the ability to create roles based on environments in BigPanda.
Roles Management
AI Detection and Response Roles
Roles are configured in ADR at Settings > Roles Management.
Key Features
Create and customize roles to restrict the availability of your organization's sensitive content.
Adjust access to areas and functionality of BigPanda on a per-user basis.
Organizations using Single Sign-On with Just-in-Time Provisioning can automatically assign roles to user accounts the first time they sign in to BigPanda.
Protect your organization's resources by configuring access to specific environments.
The separation of duties provided by Role-Based Access Control (RBAC) localizes areas of access, providing very clear parameters for each user's responsibilities.
Relevant Permissions
Only users with Full access can grant role permissions for a newly created resource. Add Roles Management with Full Access for access to these permissions.
Permission Name | Description |
|---|---|
Roles Management | View, add, edit, and delete BigPanda Roles. |
Access Levels
A user account may have one or more roles, and each role may have one or more permissions associated with it. The same role can be assigned to any number of accounts.
BigPanda provides three default roles: Admin, User, and Viewer (Read Only).
The Admin role includes full access to all areas of BigPanda, including the ability to interact with and make changes to resources. The role includes view only access to settings screens, and full access to take action on incidents in all environments. The Viewer (Read Only) role provides read-only access to all screens.
These default roles can be duplicated and then customized to adjust the permissions or level of access granted to your organization's BigPanda accounts or service keys.
Each permission in BigPanda has two options that dictate the level of access. The two access levels provided by BigPanda permissions are:
View - Read-only access. The resource cannot be interacted with or edited.
Full Access - All actions related to the resource can be performed.
Environment permissions can also be configured to control user access and actions in each environment. See Environment Permissions for more information.
For more information about Permission types in BigPanda, see Roles and Resource Permissions.
Create a Role
BigPanda Comprehensive Roles Management allows you to create custom roles that have access to specific sections and actions within BigPanda.
Build roles within your organization using the permissions specific to each individual BigPanda resource.
 |
Create New Role
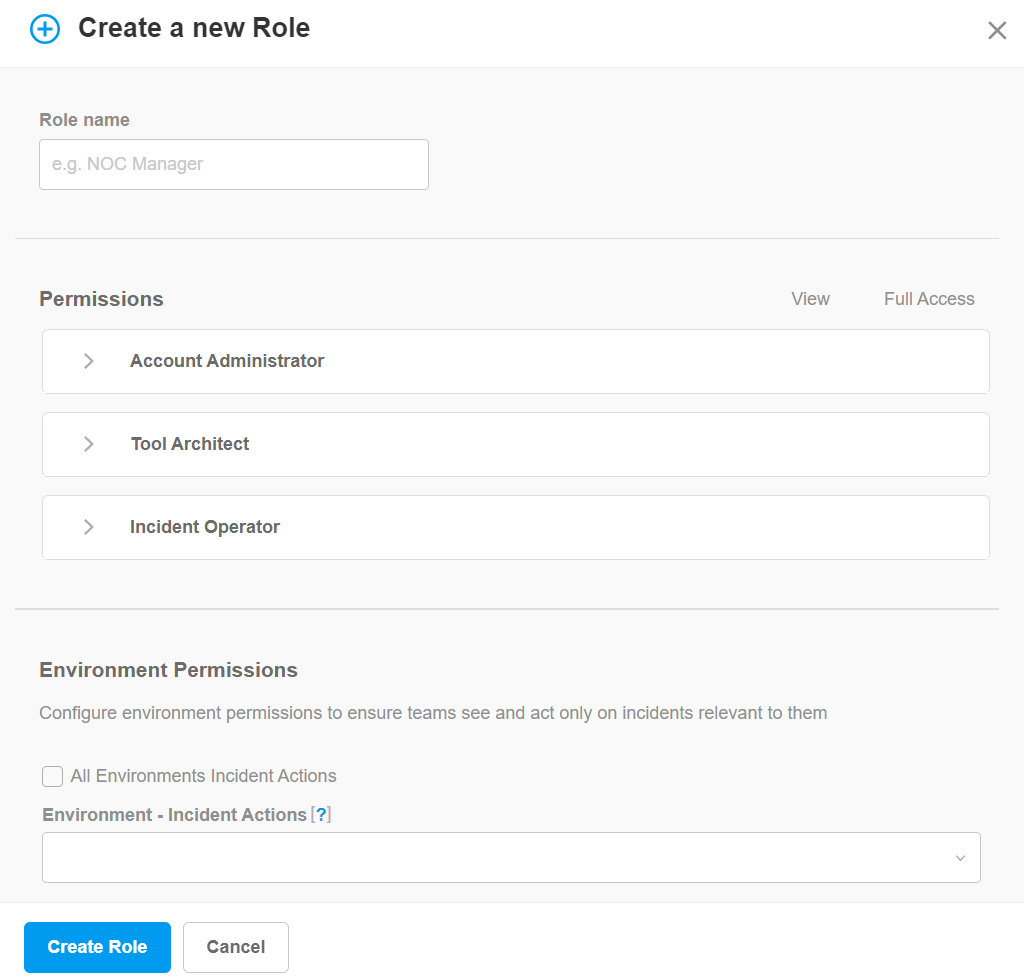
To create a new role:
Navigate to Settings > Roles Management.
Click New Role.
In the Create New Role window, enter a descriptive Role name.
Add permissions to the role using the checkboxes. Permissions are divided by functional area in BigPanda. You can select the View or Full Access option for each permission. See Roles and Resource Permissions for more information about each role.
In the Environment Permissions section, select which environments the role has access to from the Edit environment settings, Incident actions, and/or View incidents permission drop-down. Each role must have access to at least one environment to use BigPanda. See Environment Permissions for more information.
Click Create Role to save the role.
Manage Users
Adding a user to a role provides them with access to all of the permissions configured in the role. Users can be added or removed to a role from within the role details pane.
 |
Add a User to a Role
Add a User
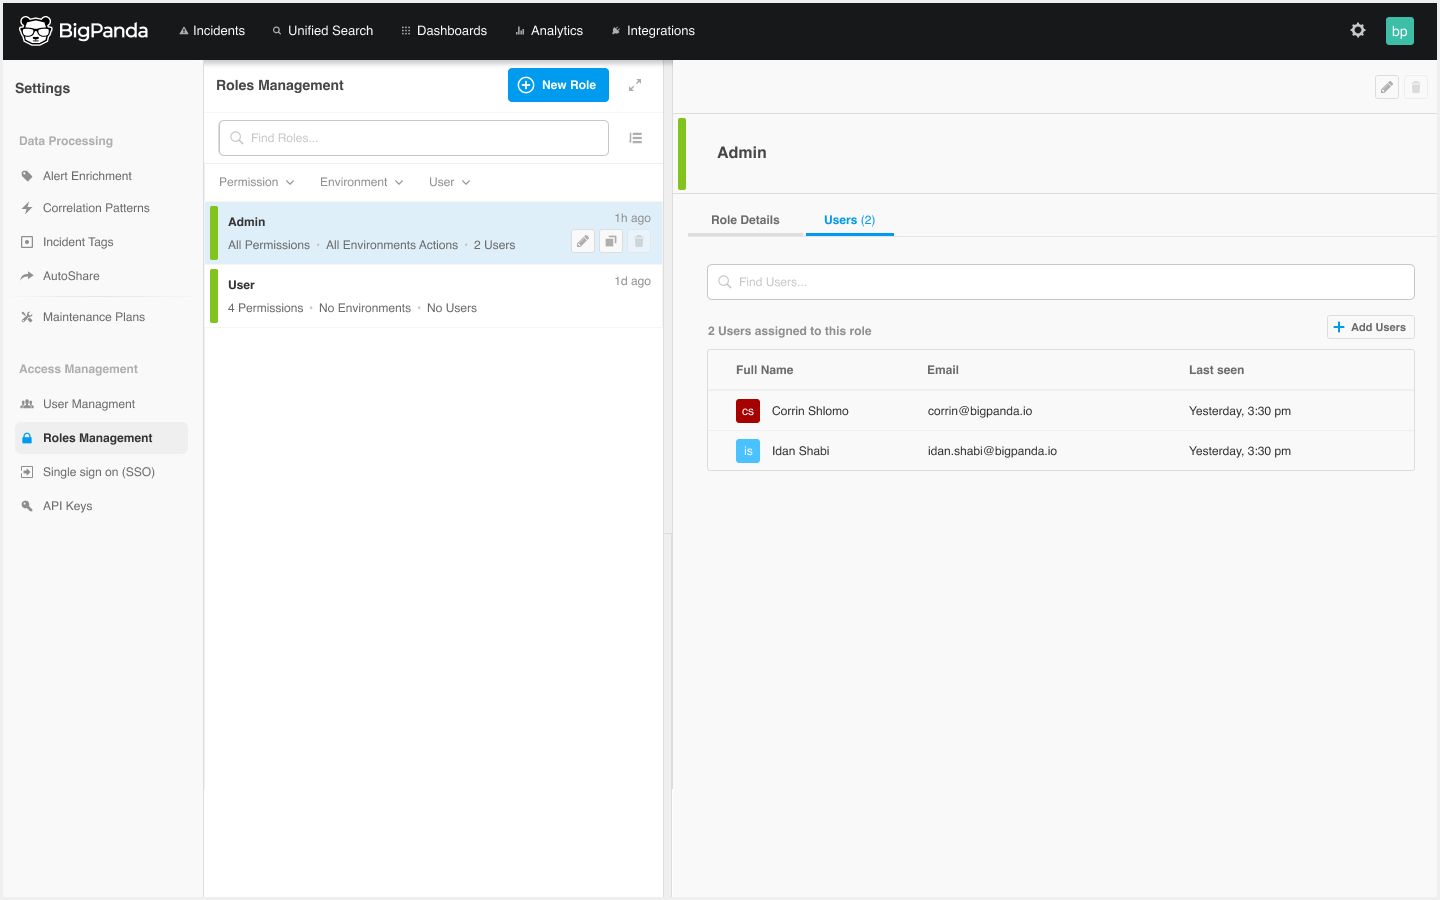
To add a user to a role:
Select the role you wish to add a user to.
In the role details pane, select the Users column.
Click the Add Users button.
In the Add Users to Role window, select users from the drop down menu, or type the name(s) of users you would like to add.
Click Add Users to save.
Remove a User
To remove a user from a role:
Select the role you wish to remove a user from.
In the role details pane, select the Users column.
In the list of users, find the user you’d like to remove.
Click the Remove button.
Manage roles
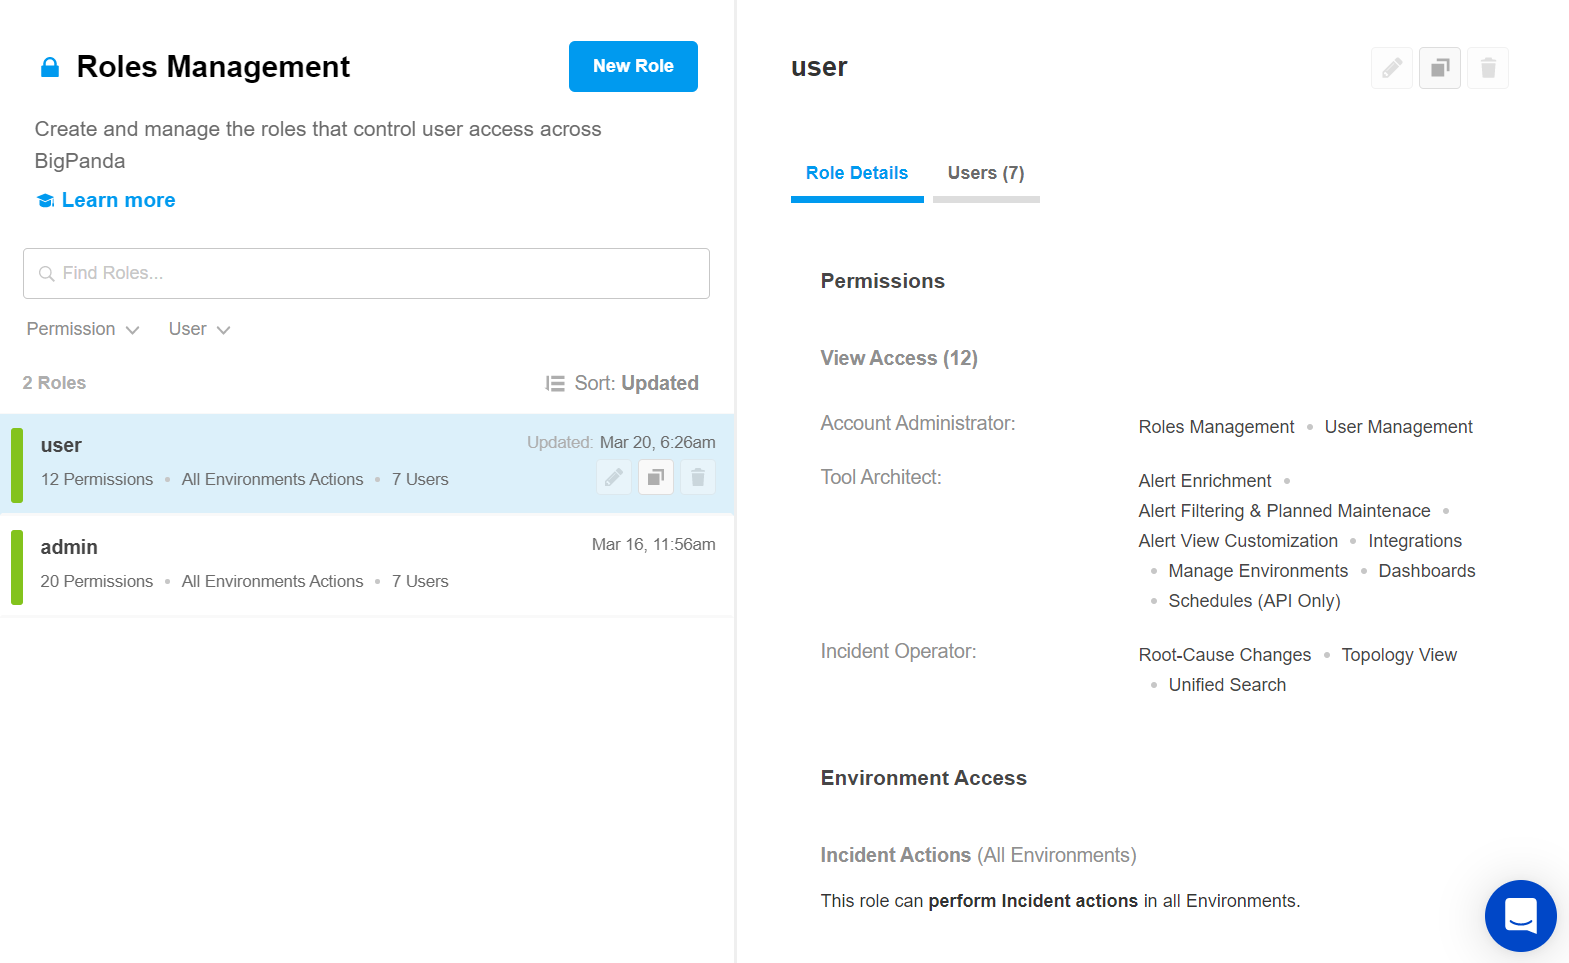
Roles can be viewed and managed in BigPanda at Settings > Roles Management. Click any role in the list to view details such as permissions and users associated with the role in the right pane.
You can search the list of roles by entering a term in the field above the list. Or, filter the list by Permission, Environment, or User.
Within the Roles Management screen, you can edit, duplicate, temporarily deactivate, or permanently delete roles.
To manage roles:
Navigate to Settings > Roles Management. A list of existing roles appears.
Select the role you wish to edit, duplicate, or delete.
Use any of the following options to modify the role:
Option | Description |
|---|---|
Edit | a. Click Edit Role. b. In the Edit Role window, modify the role according to your needs. c. Click Update Role to save. |
Duplicate | a. Click the Duplicate button. b. In the Duplicate Role window, adjust the role settings and permissions as needed. c. Click Create Role to save. |
Delete | a. Click the Trash icon. b. Click Delete to confirm, or Cancel to return to the previous page. |
Roles and Resource Permissions
Access to resources can be limited or expanded using the View and Full Access permission access levels. See Access Levels for more information.
Permissions in BigPanda are sorted into three categories based on common BigPanda user types:
Account Administrator
Permission Name | resource_type | Access Level |
|---|---|---|
API Keys | apikeys | View, edit, and create API Keys in Settings. |
Audit Logs | audit_logs | View the Audit Log in both Settings and API. |
General Settings | general_settings | View and edit General Settings. |
Roles Management | roles | View, add, edit, and delete Roles in both the UI and Roles API. |
Sharing Quotas | quotas | View and edit Sharing Quota rate limitations in Settings. |
Single Sign-On | sso | View, select, and configure a Single Sign-On provider in Settings. |
Troubleshooting | troubleshooting | View event logs for specific Integrations. |
User Management | users | View, add, edit and delete Users in Settings and the SCIM Users API. |
Tool Architect
Permission Name | resource_type | Access Level |
|---|---|---|
AI Module Configuration | aia_configuration | View and edit AI module features for your organization. |
Alert Correlation | correlations | View, edit, and create new Correlation Patterns in Settings and API. |
Alert Enrichment | enrichments | View and use the Alert Enrichment UI and API. |
Alert Filtering & Planned Maintenance | plans | View, create, edit, and delete Maintenance Plans and Alert Filters in Settings, and use the Plans V1 API. |
Alert View Customization | alert_view | View, create, and edit Alert Views in Settings. |
AutoShare | notifications | View, add, edit, and delete AutoShare Rules in Settings. |
Incident Enrichment | incident-tags-definitions | View, create, and edit Incident Tags in Settings. |
Incident Feed View | incident_view | View, create, edit, or delete Incident Feed Views in Settings. |
Integrations | integrations | View, install, and edit integrations in the Integrations Tab. |
Manage Environments | environments | View, create, edit, and delete Environments in the UI and API, and view the incidents environments contain. See Environment Permissions for more information. |
Mapping Enrichment (API Only) | enrichments-jobs | Use the Mapping Enrichment API. |
Schedules (API Only) | schedules | View and use the Schedules API to define the specific start and end times of Plans configured with the Plans V1 API. |
Unified Analytics | analytics | View, edit, and create new dashboards in the Analytics Tab and assign the Dashboard Designer role. |
Incident Operator
Permission Name | resource_type | Access Level |
|---|---|---|
Dashboards | dashboards | View, customize, and interact with Dashboards. |
Root-Cause Changes | changes | View change details within an incident's Changes Tab and mark changes as Suspect or Match. |
Service Health Dashboard | service_health_dashboard | View and configure the Service Health Dashboard. |
Topology View | topology | View, upload, or edit topology maps via API, and view the Topology Tab in incident details. |
Unified Search | search | Access Unified Search. |
Environment Permissions
Environment permissions in BigPanda allow you to manage access to specific environments. To provide access to manage (create, delete, edit) all environments, assign the Environments permission with the Full Access level.
Environment permissions can be assigned during the role creation process. To add specific environment permissions, follow the steps to Create or Edit a role, and scroll to the Environment Permissions section.
Full access permissions
If you assigned the full access Environments permission to a role, a message will appear that says This Role has a permission to manage (create, delete, edit) all environments.
 |
Environment Permissions
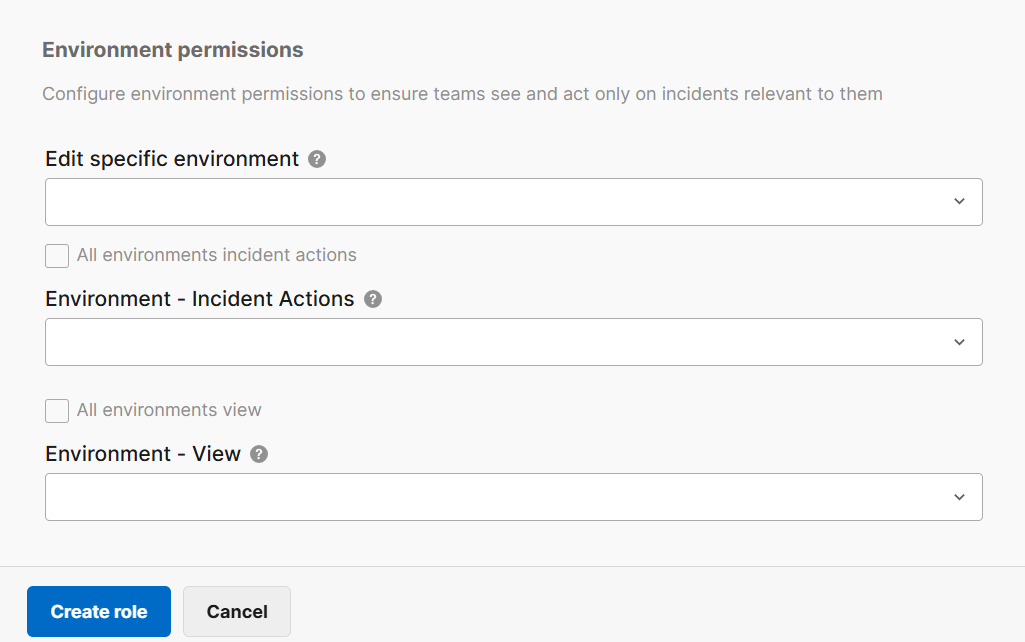
The following permission types are available for environments:
Edit specific environment - Ability to edit the specified environment(s) or environment filters. Cannot create, duplicate, or delete environments.
Incident actions - Full access ability to perform actions on all enrichment tags and incidents (assign, snooze, share, comment), minus environment configuration in the specified environment(s).
View incidents - Read-only access to all enrichment tags and incidents in the specified environment(s) without the ability to change or perform any incident action.
Select environment(s) that you would like to assign access to from the drop down menus.
View only access
Users must have at least view-only access to at least one environment in order to log in and use the BigPanda UI.
AI Incident Assistant and Prevention Roles
Roles are configured in the web app at Access Controls > Roles.
Roles
Within the Roles page, you can configure roles to control permissions for your organization. Roles allow you to restrict what source data users can access, which parts of the web app they can use, and what action plans they can execute.
Two standard roles are included, but you can also create custom roles to fit your organization's needs.
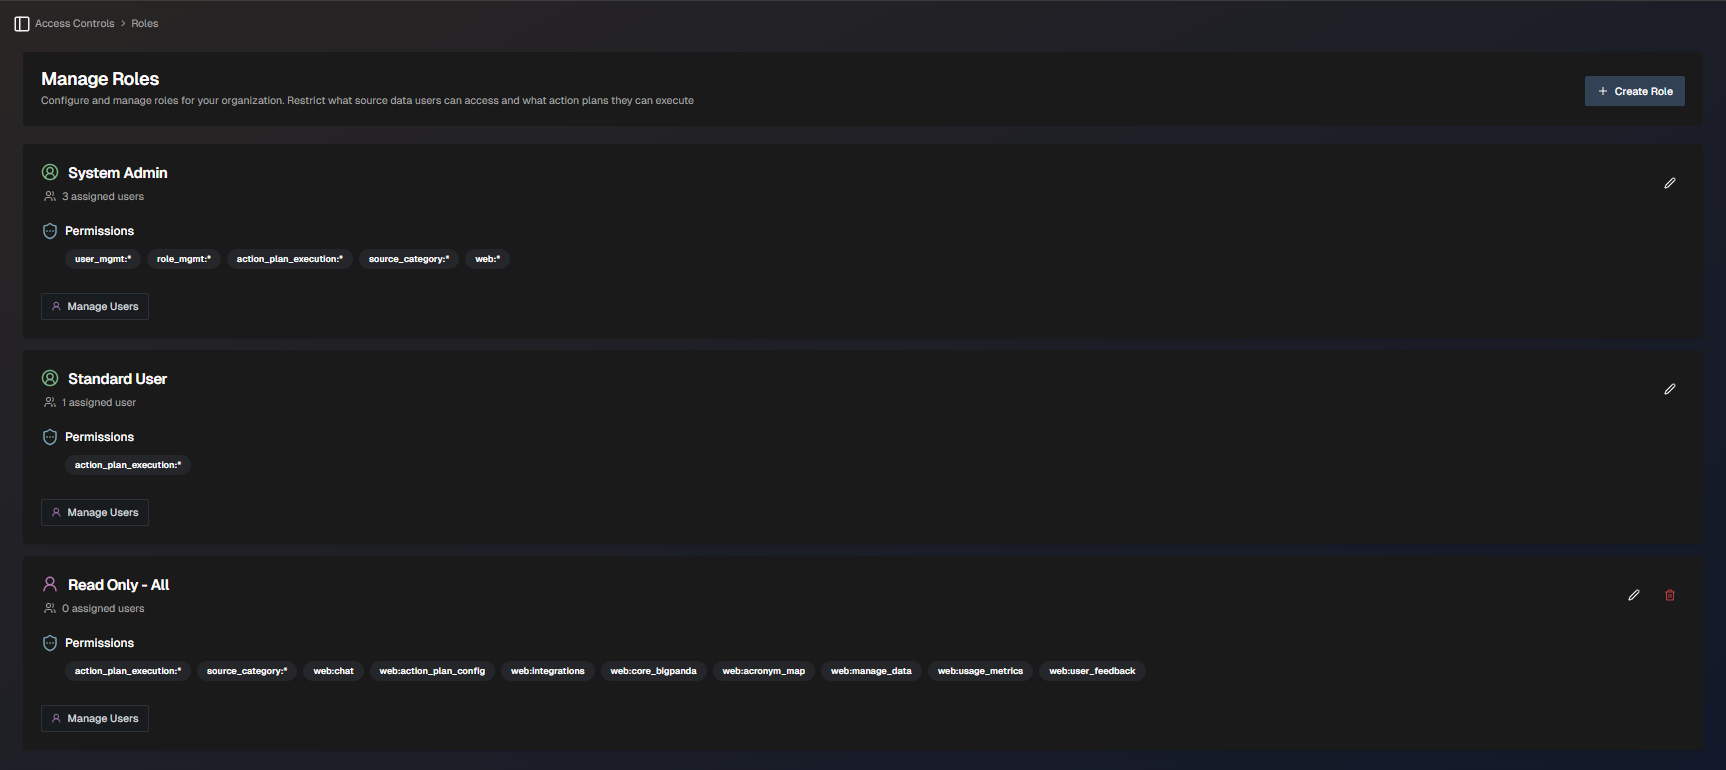
The Roles Page
Use the Search bar to find a specific role in the list.
Standard Roles
Biggy offers two standard roles:
System Admin - Allowed to execute any action plan, and edit all sections of the web app. This role cannot be edited.
Standard User - Able to execute all action plans. If a user is not assigned a role upon creation, they will receive this role by default. This role can be edited.
Role icons
Standard roles have a green or red icon next to the name. Custom roles have a purple icon.
System Admin
Permission name | Resource Name | Access Level |
|---|---|---|
Action Plan Execution | All | Execute |
Biggy Web App | All | View, Edit |
Data Access | All | View |
Role Management | All | Edit |
Source Category | All | View |
User Management | All | Edit |
Standard User
Editable role
The Standard User role can be edited. The permissions and access levels below are the system default for this role.
Permission Name | Resource Name | Access Level |
|---|---|---|
Action Plan Execution | All | Execute |
Data Access | All | View |
Web app access
Standard Users are able to log in to the web app, but can only view the Dashboards and Guides and Resources sections.
Create a Role
Custom roles have access to specific sections and actions within Biggy.
To create a new role:
Within the web app, navigate to Access Controls > Roles.
Select + Create Role.
Enter a descriptive Role Name.
In the Permissions section, select a Resource Type from the drop-down menu. See Resources for more information about the resource types available.
Select a Resource Name from the drop-down menu. To provide access to all of the available resources, select All.
Under Actions, specific actions are enabled by default. Click an action name to disable it if necessary.
Disabling actions
If a resource only has one action type available, and that action is disabled, you cannot add the permission to roles.
Click Add Permission to add it to the role. It then appears in the Enabled Permissions section on the right side of the pane.
(Optional) Repeat steps 4-7 to add additional permissions to the role.
(Optional) In the Integration Permissions section, you can determine what ServiceNow tables users with this role have access to. If no integration permissions are added, users with this role assigned will have full access to all ServiceNow tables.
Click + Add ServiceNow Table Permissions and populate the following information:
In the Access Mode section, select the permission's behavior.
Choose Allow only these tables to only allow users to access the tables configured.
Select Deny these tables (allow all others) to prevent users from accessing only the tables selected.
In the Tables section, select the Match Type (Exact, Starts With, Ends With, or Contains).
Enter the Table Name / Pattern. Click Validate to ensure the name or pattern entered matches an existing table.
(Optional) Click + Add Table to add additional tables, and repeat steps b-c.
Click Create Role to save the role.
Manage enabled permissions
Click the Delete icon on the permission name to remove it from the list.
If there are a large number of permissions for a role, use the search bar to filter the enabled permissions list to find what you need.
Resources
The following resource types are available for building roles for Biggy:
Resource Type | Description | Actions |
|---|---|---|
Action Plan Execution | Determines which action plans Biggy is able to execute for a user. In the Resource Name selection, you can choose from the action plans your organization has enabled or select All. | Execute |
Data Access | Determines which indexed data Biggy is able to use to answer questions or perform tasks for a user. In the Resource Name selection, you can choose from the data sources your organization has enabled or select All. | View |
User Management | Provides access to the Users page in the web app. | Edit |
Role Management | Provides access to the Roles page in the web app. | Edit |
Biggy Web | Determines which areas of the web app a user is able to view or edit. In the Resource Name selection, you can choose from the specific sections of the web app or select All. | View, Edit |
Add a Permissions Message
You can add a custom permissions message that appears when a user attempts to perform an operation, but doesn't have the correct role.
For example, you can add a message letting users know who to contact to request the correct permission.
To add a permissions message from the Roles screen, click Settings. The Permissions Message window opens, where you can add a custom message.
Standard notification
Each permission message automatically begins with the standard permission denied notification.
For example, if you configure the custom message to say:
"To request access, please open a DTM ticket and specify BiggyAccess as the subject"
The final message will be:
"You do not have the necessary permissions to perform this operation. To request access, please open a DTM ticket and specify BiggyAccess as the subject"
Manage Users in Roles
Adding a user to a role grants them access to all resources configured for that role. Users can be added to or removed from a role from within the Roles screen.
To add a user to a role, navigate to the role that you would like to assign to a user and click Manage Users.
Users who have not been assigned a role appear on the left side in the Available section, while users who have been assigned a role appear on the right side in the Assigned section.
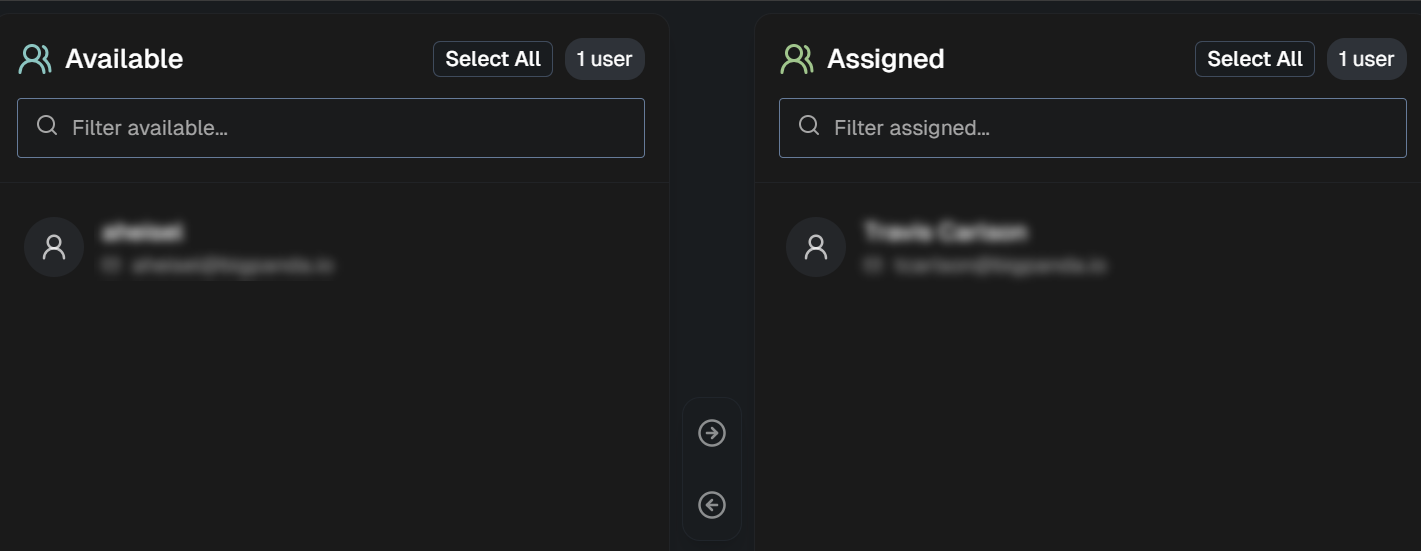
Manage Users screen
To assign a user to a role, select their name from the Available section. You can select multiple users at a time, or click Select All to select all of the users in the list. To find a specific user, type a name or email address into the Filter available box. Click the right arrow to move the user(s) to the Assigned section.
To unassign a user from a role, select them from the Assigned section and click the left arrow to move them to the Available section.
Click Save Changes to apply the role changes.
Edit or Delete a Role
To edit a role, click the pencil icon.
To delete a role, click the trash can icon. The deleted role will be unassigned from all users and cannot be retrieved.
Default roles
Default roles can be edited, but not deleted.
Next Steps
Learn about user management in BigPanda
Learn about managing your personal account
Find your way around the BigPanda Settings page